Published: May 29, 2026
Last Updated: June 24, 2026
Most “smart home upgrades” feel like an app project. Smart switch installs don’t. They’re a wiring project first, and a smartphone project second.
If you want the cleanest result (normal wall switch feel, plus schedules and voice control), a smart switch is usually a better long-term move than swapping every bulb. If you’re still deciding which model fits your wiring and platform, start with this Smart Switch for Home buyer’s guide, then come back here for the install.
Who this guide is for
You would be a good match if you able to follow a wiring diagram, are happy doing power off at the breaker/consumer unit and are prepared to stop if something doesn‘t look quite right.
Not sure yet? That’s normal. Let’s make it simple.
Smart switch installation guide: what to check before you touch a screw
Tools and materials (the non-negotiables)
Here’s what you actually need for a clean install:
- A non-contact volt tester (or a multimeter if you‘re familiar with it)
- Screwdrivers (usually Phillips + flat)
- Wire strippers/cutters
- Wire connectors (wire nuts or lever connectors)
- Electrical tape (for labeling, not “fixing” broken wiring)
- Your smart switch + wall plate (if your switch doesn’t include one)
Quick note: Smart switches are bulkier than dumb switches. If your wall box is shallow or already packed, plan on a tight fit.
Safety rule you should treat like law: verify the circuit is de-energized before you touch conductors—don’t rely on “the breaker label seems right.” OSHA’s guidance explicitly requires verifying equipment is deenergized with test equipment before work begins (OSHA work-practice requirement).
Compatibility checklist (neutral, box depth, switch type, bulbs)
Before you buy (or before you open the wall), check these:
- Neutralwire: A number of Wi-Fi changes require a neutral; not all do.
- Switch type: single-pole vs 3-way (US) / 2-way (UK/India).
- Load type: on/off vs dimmer; dimmers require compatible bulbs.
- Box depth: Smart switches often need more space for electronics.
Identify your switch type (single-pole vs 3-way / 2-way)
Quick signs you’re in a multi-way circuit

You might have a multi-way setup if:
- Two different switches control the same ceiling light, hallway light, or staircase light.
- The switch you’re replacing has three insulated conductors connected (plus ground/earth), not just two.
In the US, this is usually called a 3-way circuit (two switches, one light). In the UK and India, you’ll often hear 2-way for the same idea.
When a “simple swap” isn’t simple anymore
If your existing switch box has:
- Burn marks on insulation,
- Aluminum wiring,
- A confusing bundle of multiple circuits,
- Or the wiring doesn’t match the smart switch diagram at all…
Stop. It’s not you being cautious. It’s you being smart.
The CPSC has a long-running warning that loose connections and aging wiring can overheat and become a real hazard (CPSC guide to home wiring hazards).
Smart switch wiring guide: line, load, neutral, ground
Here’s the fastest way to think about it:
- Line (hot/live) brings power into the box.
- Load sends power to the light.
- Neutral completes the circuit (and often powers the switch’s smart electronics).
- Ground/Earth is the safety path.
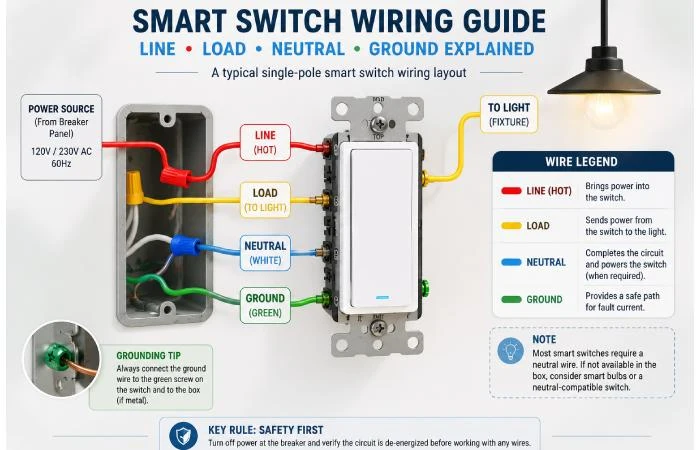
A practical way to label wires before disconnecting
Do this before you loosen anything:
- Take a clear photo of the existing wiring (two angles if possible).
- Attach a small tape flag to every one of the conductors.
- Mark what you think it is (LINE, LOAD, NEUTRAL, GROUND).
- Only then start disconnecting.
That photo becomes your “undo button” if you get interrupted.
Neutral wire: how to spot it (and what to do if you don’t have one)
Most often:
- US: Neutral wires are white and bundled in the back of the box.
- UK/India: neutral is often blue (modern) or black (older conventions), and it may not be present in the switch box, depending on how the lighting circuit was wired.
If there’s no neutral in the box, you have options:
- Buy a neutral-compatible smart switch (some dimmer ecosystems do this well).
- Use a smart bulb + a smart button/remote (less invasive).
- Have an electrician run a neutral (best “future-proof” option, but not cheap).
Fair warning: don’t “borrow” ground/earth as neutral. That’s unsafe.
Step-by-step: install a smart light switch (single-pole)
This section is the fundamental DIY smart switch installation flow for most single-pole wall boxes.
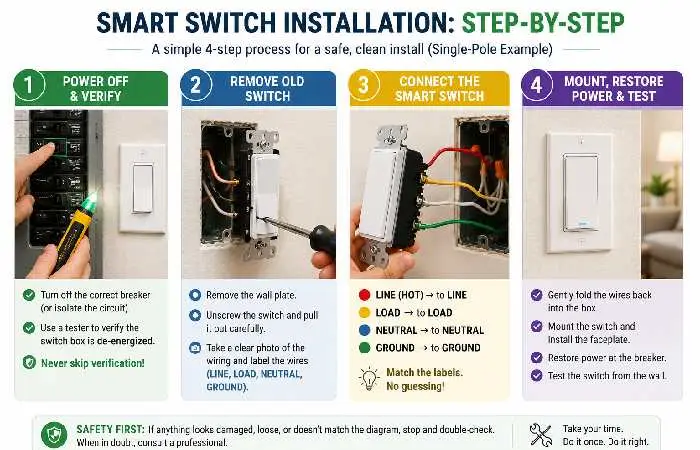
1) Power off + verify
Turn off the right breaker (United States) or isolate the circuit at the consumer unit (India/UK)
Then, verify the switch box is dead with a tester. Don’t skip the verification step because “the light went out.” Backfeed and labeling mistakes happen.
2) Remove the old switch
- Remove the faceplate.
- Unscrew the switch and gently pull it forward.
- Notice the conductors and learn how they correspond to your manual for the smart switch.
If the copper appears burnt or burnt, or feels dry and brittle… Pause, reconsider the task.
3) Connect the new smart switch
The specific terminals differ by brands and the pattern is generally:
- LINE → LINE (hot/live feed)
- LOAD → LOAD (to fixture)
- NEUTRAL → neutral bundle/neutral terminal (if required)
- GROUND/EARTH → ground/earth
Quick sanity check: the switch should not require you to “guess.” If you’re guessing, you’re missing a wire identification step.
4) Mount, restore power, and test
- Fold wires back carefully (accordion fold helps).
- Mount the switch and install the faceplate.
- Restore power.
- Test the physical button first.
Only after the physical on/off works should you move to app setup.
3-way (US) / 2-way (UK & India) DIY smart switch installation: what changes
This is where most DIY installs go sideways, because multi-way circuits look “close enough” until they aren’t.
The “main” box vs the “other” box
Many smart 3-way/2-way solutions require:
- One main/master smart switch in the box that has line power (or the box the manufacturer specifies), and
- One companion/aux switch or a supported traditional switch in the other location.
So you may have to identify which box has the always-hot feed.
Traveler/strapper wires (what you’re actually looking at)
In simple terms, travelers are the two wires linking the two switch locations.
If your smart switch kit includes a wiring diagram for travelers, follow that exact diagram. Generic diagrams are how people end up reopening the wall.
When in doubt: call a licensed electrician for multi-way circuits. It’s often cheaper than repeated troubleshooting.
Country notes: home electrical smart switch rules in the US, UK, and India
This guide is written to be useful globally, but it’s important to call out what changes across US, UK, and India installs.
Voltage expectations and safety mindset
- US: typically ~120V for lighting circuits.
- UK & India: typically ~230V. That’s a different level of risk.
Even though the wiring steps may be similar on paper, the rule “don‘t take shortcuts” is more important with higher voltage. If you‘re unsure, get a professional.
DIY compliance and when to hire a pro
In the UK, electrical work within a dwelling may be covered by Building Regulations (Part P). For guidance on whether your individual job is notifiable or requires certification, it‘s best to check with local building control guidance (UK building control guidance on electrical safety).
In India, local practice varies by building type and city, and many homeowners still choose an electrician for in-wall work even when they handle “smart setup” themselves. That split—electrician for wiring, homeowner for app pairing—is common and sensible.
Smart switch setup tutorial: app pairing, Wi‑Fi, Matter, and voice assistants
Once the physical switch works, the rest is usually straightforward.
Pairing steps that work for most brands
Most setups follow a similar flow:
If you’re branching out beyond switches, then the longer list of AI-powered home gadgets might spark some automation ideas that you actually find useful.
Security basics you shouldn’t skip
Smart switches are network devices. Treat them like it.
- Update firmware when the app prompts you.
- Use a strong Wi‑Fi password.
- Think about putting IoT devices on a guest network (if your router supports that), or on a separate VLAN.
Troubleshooting + common mistakes (so you don’t open the wall twice)
Quick symptom → cause → fix table
| Symptom |
Likely Cause |
Try This |
| The switch has no power |
load misidentified/Line, breaker still off, loose connector |
Tighten connectors, recheck line identification, and verify the breaker |
| Light works, but the switch reboots or goes offline |
Overcrowded box pinching wires, Neutral issue (required but not connected) |
Confirm neutral requirement and connection; refold wires |
| Flickering with LEDs |
Loose connection, dimmer, and wrong bulbs |
Use dimmable LED bulbs. Test connectors |
| Won’t connect to Wi-Fi |
Weak signal, not in pairing mode, 5Ghz only network |
Switch to 2.4GHz, move the router or mesh node closer, reset, and try again.
|
| 3-way/2-way behaves strangely |
Incorrect box of master switch, traveller confisting. |
Follow the kit diagram; find the always-hot box; get an electrician to check it out for you |
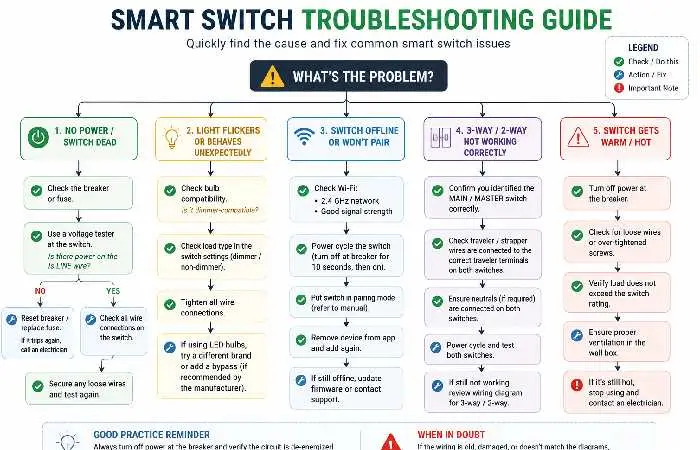
The mistakes that cause flicker, random shutoffs, and “offline” switches
Based on what homeowners commonly report in reviews and forums, the big ones are:
- Mixing up line vs load (it happens more than people admit).
- Leaving a neutral loose (smart switch powers up, then acts unstable).
- Packing wires too tightly so that a connector loosens when you push the switch back in.
- Assuming all rooms are wired the same.
Here’s the thing: most failures aren’t “bad hardware.” They’re small wiring errors that show up only after the box is closed.
How long it take + cost reality check (DIY vs electrician)
Typical time by scenario
In most cases:
- Single-pole replacement with clear wiring: 30–60 minutes
- No-neutral workaround or crowded box: 60–120 minutes
- 3-way/2-way smart kit install: 90–180 minutes
If you’re a first-timer, plan extra time. That’s fine.
When paying an electrician is cheaper than guessing
Paying a pro tends to win if:
- Your home has older or questionable wiring
- The box is too shallow and needs replacement
- You need a new neutral in the switch box
- You’re doing multi-way wiring, and the diagram doesn’t match what you see
Your goal isn’t “DIY at all costs.” It’s “safe and reliable.”
Final checklist + next steps
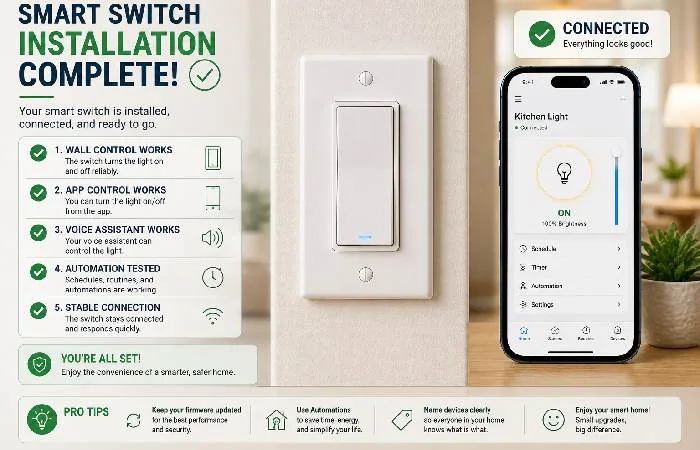
Before you call it “done.”
- The switch toggles the light reliably from the wall
- No buzzing, overheating, or hot faceplate
- App control works on your phone (on Wi‑Fi and on mobile data)
- Voice assistant works (if you use one)
- Automations/schedules run correctly for 2–3 days
Where to go next on this site
If you’re building a broader setup, browse the best home gadgets to plan automations that go beyond “turn lights on.”
And if you’re still comparing models (Wi‑Fi vs hub, dimmer vs on/off, no-neutral options), head back to the Smart Switch for Home buyer’s guide.
That’s it. Your smart switch installation guide shouldn’t feel mysterious after this.
FAQs
1) Do I need a neutral wire to install a smart switch?
Yes, typically, specifically, the switches for the WiFi. If you cannot find a neutral in the box, look for a neutral-friendly switch or call an electrician to install a neutral.
2) What’s the difference between a smart switch and a smart bulb?
A smart switch controls the fixture like a normal wall switch (and keeps the “wall switch habit”). Smart bulbs work well, also, but they can be a little confusing if someone turns the wall switch off.
3) Can I install a smart switch myself?
If you are familiar with switching off, testing the power and reading wiring diagrams, then it is likely you will be able to carry out a DIY single-pole project. For more complicated wiring or multi-way circuits, seek specialist assistance.
4) Why won’t my smart switch connect to Wi‑Fi?
More likely: Your phone is on 5GHz. The switch supports only 2.4GHz. Or the signal is weak for that wall position. Reset and try pairing again on 2.4GHz.
5) What is a 3-way switch (US) / 2-way switch (UK/India)?
It‘s when two switches operate the one light (e.g., hall). For some, between bulbs, smart installs draw up to a ‘master + companion’ arrangement.
6) Can I use ground/earth as neutral?
No. It’s unsafe and not code-compliant.
7) Do smart switches work during internet outages?
Usually, the physical switch still works locally, but app and voice control may not. Exact behavior depends on the brand and whether it uses a local hub.