Published: September 28, 2026
Last Updated: September 28, 2026
Need a screen recorder for Windows? You might not need to install anything at all. Windows 11 has screen recording built into the Snipping Tool app. Xbox Game Bar is another built-in way to record a compatible app or game, on both Windows 10 and Windows 11. Microsoft Clipchamp adds recording and editing features. Third-party software like OBS Studio? More control over capture sources and audio.
The right option depends on what you want to record.
Quick Answer
Quick recording of a selected area on Windows 11? Use Snipping Tool. Xbox Game Bar is a convenient built-in option for recording a supported app or game, with system audio and optional microphone input. Need editing and screen-plus-camera recording? Clipchamp can be useful. For multi-source recording, advanced audio control, streaming or more detailed configuration, OBS Studio is a stronger fit.
How Does Screen Recording Work on Windows?
Screen recording captures what’s displayed on your computer. The result gets saved as a video file. Depending on the tool, you can record a selected region, an application, a game, a browser tab or an entire display.
The important difference is that not every Windows recorder captures the same sources.
A basic recording may need only:
- Your screen
- Your microphone
- System audio
A more advanced recording might also need:
- Webcam video
- Multiple displays
- A particular application window
- Game capture
- Separate audio sources
- Multiple scenes
- Editing or effects
Windows provides several ways to handle these requirements.
| Recording need |
Suitable option |
| Selected area of the screen |
Snipping Tool on Windows 11 |
| Supported app or game |
Xbox Game Bar |
| Screen plus webcam and editing |
Clipchamp |
| Advanced multi-source recording |
OBS Studio |
| System audio + microphone control |
Game Bar or dedicated software |
| Streaming and recording together |
OBS Studio |
Microsoft’s current documentation confirms that Snipping Tool can record a selected rectangular area, while Xbox Game Bar can record an app or game and include computer audio.
How to Record Your Windows Screen
The best method depends on your version of Windows and what you want to capture.
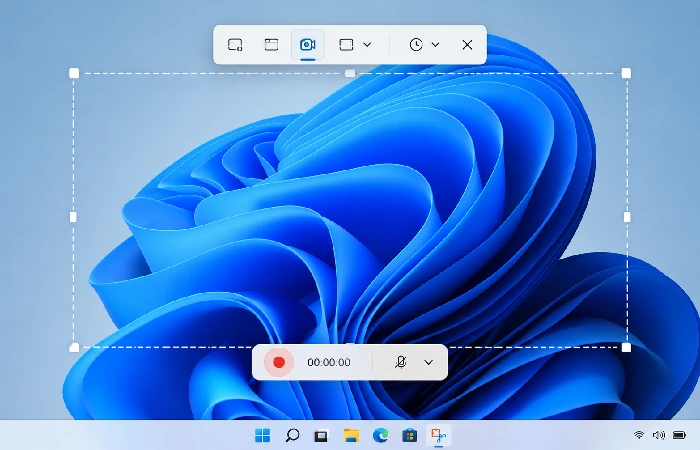
Method 1: Record a selected area with Snipping Tool
On Windows 11, Snipping Tool includes a video-recording mode.
To record:
- Open Snipping Tool.
- Select the Record option.
- Select New.
- Choose the rectangular area you want to capture.
- Select Start.
- Perform the actions you want to record.
- Select Stop when finished.
- Save the recording or continue working with it in Clipchamp.
You can also use Windows + Shift + R to start the video-snipping workflow.
This method is particularly useful when you want to show a specific part of your desktop rather than record an entire application session. Microsoft documents Snipping Tool’s video-snipping workflow and the ability to edit the resulting clip in Clipchamp.
Method 2: Record an app or game with Xbox Game Bar
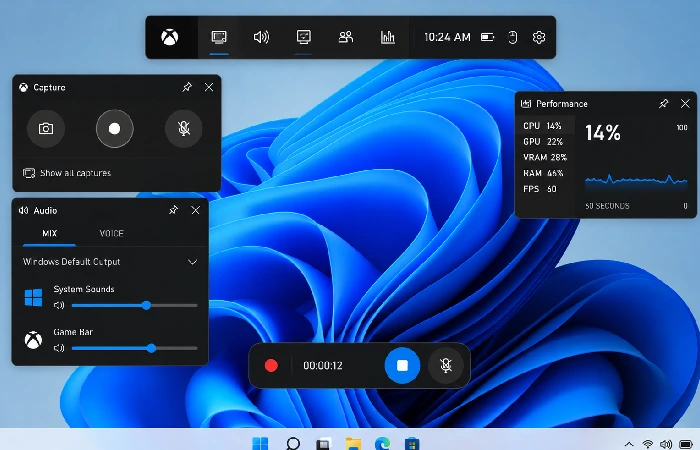
Xbox Game Bar is available on Windows 10 and Windows 11.
First, open the app or game you want to capture.
Then:
- Press Windows + G to open Xbox Game Bar.
- Check the capture and audio settings.
- Press Windows + Alt + R to start recording.
- Use Windows + Alt + M if you need to toggle the microphone.
- Press Windows + Alt + R again to stop.
Game Bar saves recordings as MP4 files under Videos > Captures.
Game Bar is especially convenient for a quick recording. A particular app or game, that is. It isn’t the same kind of workflow as a full production recorder. Need multiple sources or more detailed control? You may want another option.
Method 3: Record with Clipchamp
Microsoft Clipchamp. Screen recording and video editing in one place.
Open the recording tools in Clipchamp and pick the screen-recording option. Depending on the recording method, you can select a browser tab, application window or screen. Your microphone works too.
Clipchamp can also record screen and camera together. Good for tutorials, presentations and demonstrations. Viewers see both the software and the presenter.
The main advantage is the workflow after recording. Instead of immediately opening another editor, you can trim and edit the captured video inside Clipchamp. For personal accounts, Clipchamp’s screen recordings in the video editor are currently limited to 30 minutes per recording, so longer sessions may need to be recorded in separate parts.
Method 4: Record with OBS Studio
OBS Studio is designed for users who need more control.
After installing OBS:
- Open OBS Studio.
- Run the Auto-Configuration Wizard if prompted.
- Create or select a scene.
- Add a capture source such as Display Capture, Window Capture or Game Capture.
- Check your desktop audio and microphone meters.
- Confirm the recording settings.
- Select Start Recording.
- Stop the recording when finished.
OBS’s official Quick Start Guide recommends checking the audio meters and testing the recording before starting an important session. Its documentation also explains Display Capture, Window Capture and Game Capture sources.
How to Capture System Audio and Microphone Sound
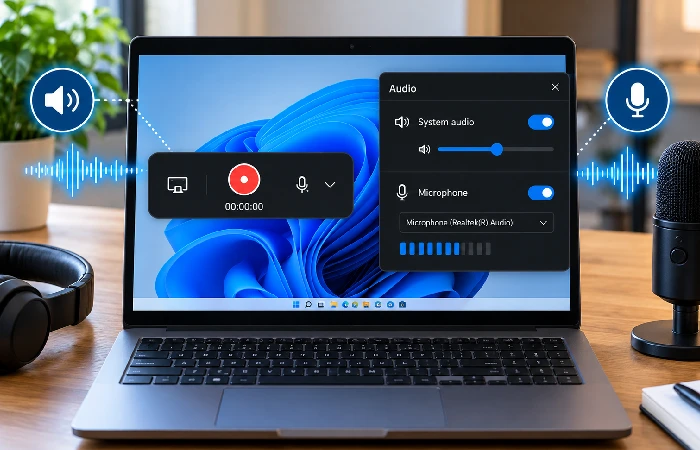
Screen recording and audio recording are related but separate tasks.
System audio is sound produced by the computer, such as application sounds, game audio or other computer playback.
Microphone audio is sound captured from your microphone, such as your voice.
If you need both, check both sources before recording.
Using Xbox Game Bar
Xbox Game Bar includes an audio setting for computer sounds. Microsoft documents an All option under the Capturing settings for including computer audio. You can also toggle the microphone during recording.
A simple workflow is:
- Open the application or game.
- Press Windows + G.
- Open the Game Bar settings.
- Go to Capturing.
- Check the audio option you need.
- Confirm your microphone setting.
- Start recording with Windows + Alt + R.
- Speak during the recording if narration is required.
- Stop and play the recording back.
Always review a short test recording before starting a long tutorial or presentation.
Using Clipchamp
Clipchamp can record screen content and lets you choose a microphone before recording. Its screen-recording workflow can capture a browser tab, application window, or entire screen, depending on the sharing option available in the recording dialog. Clipchamp is especially useful when you want to trim, edit, or combine the recording with other video elements after capture. Microsoft explains the Clipchamp screen-recording workflow, including access through the Record & Create area and screen or screen-and-camera options.
This makes Clipchamp useful when the recording needs some editing after capture.
Using OBS Studio
OBS provides substantially more audio control.
Its default setup can capture desktop audio and microphone input, and the Audio Mixer lets you check whether the selected sources are actually producing sound. You can also manually choose audio devices through the audio settings.
Before recording, look at the audio meters.
If the desktop-audio meter moves when your computer plays sound and the microphone meter moves when you speak, the selected sources are being detected.
Built-In vs Third-Party Windows Screen Recorders
Windows’ built-in tools are often enough for short recordings. Third-party software becomes more useful when the recording itself is only one part of a larger production workflow.
| Feature |
Built-in Windows tools |
Third-party recorder |
| Quick recording |
Excellent for basic tasks |
Usually available |
| Selected screen area |
Available in Snipping Tool on Windows 11 |
Common |
| App/game recording |
Game Bar |
Common |
| Microphone |
Available in supported workflows |
Usually available |
| System audio |
Available in supported workflows |
Usually available |
| Webcam |
Clipchamp supports screen + camera |
Common |
| Multiple sources |
Limited compared with advanced software |
Stronger |
| Advanced audio controls |
Limited |
Strong |
| Scenes and layouts |
Limited |
Available in tools such as OBS |
| Editing |
Clipchamp provides editing |
Depends on software |
| Streaming |
Not the main purpose of Windows’ basic recorder tools |
Common in advanced tools |
When built-in Windows tools are enough
Use the built-in tools when you need to:
- Record a short app demonstration
- Capture a problem for support
- Record part of the Windows desktop
- Capture a game or supported application
- Add simple narration
- Create a quick work or school recording
There is little reason to install a large recording application if a built-in tool already handles the task.
When third-party software makes sense
Consider a dedicated recorder when you need:
- Multiple capture sources
- More detailed audio control
- Webcam layouts
- Scenes
- Streaming
- Advanced recording settings
- More control over the final production
OBS is a good example of this type of workflow. Its official documentation supports multiple sources, scenes, audio mixing and detailed recording configuration.
The important point is that more features do not automatically mean a better recording experience. Extra controls can also make setup more complicated.
How to Choose a Windows Screen Recorder
Start with the recording rather than the software.
Ask these five questions before choosing a tool.
1. What exactly do you need to capture?
If you only need a rectangular section of the Windows desktop, Snipping Tool may be sufficient on Windows 11.
If you need to capture a supported application or game, Game Bar may be more convenient.
If you need several sources at the same time, consider a dedicated recorder.
2. Do you need system audio?
If viewers need to hear the computer or application, confirm that the selected recorder supports system-audio capture for your workflow.
Do not assume that screen capture automatically means audio capture.
3. Do you need your microphone?
For tutorials and demonstrations, microphone narration can make a recording much easier to follow.
Test the microphone before recording the full session. A perfect video with missing narration usually means repeating the entire recording.
4. Do you need a webcam?
A webcam helps. Mainly when the viewer needs to see the presenter as well as the screen.
Clipchamp supports screen-and-camera recording. With OBS, you can combine multiple video sources in a scene.
5. Do you need editing or streaming?
Recording only needs to be saved and shared? A simple recorder can be enough.
Trimming, layouts, multiple sources or a streaming workflow are a different story. Choose software built around those requirements.
A simple decision guide
- Choose Snipping Tool if you use Windows 11 and need to record a selected part of the screen.
- Xbox Game Bar suits a quick recording of a compatible app or game. Simple built-in workflow, with computer-audio options and microphone controls. You can start or stop recording with
Windows + Alt + R. Toggle the microphone with Windows + Alt + M. Microsoft explains both in its Xbox Game Bar recording guide.
- Clipchamp fits when recording and basic video editing belong in the same workflow.
- Need multiple sources, detailed audio controls, scenes or a recording-and-streaming workflow? Go with OBS Studio.
Tips for Better Windows Screen Recordings
A few preparation steps can prevent most recording problems.
Close unnecessary applications
Extra applications can consume CPU, GPU, memory and storage resources. Closing programs you do not need can also make the recording easier to manage.
Check your recording area
Before pressing Record, confirm that private information, notifications or unrelated windows are not visible.
Test the audio
Record a short sample and play it back.
Check:
- Can you hear the system audio?
- Can you hear your voice?
- Is the microphone too loud?
- Is there unwanted background noise?
- Is the audio delayed?
Check available storage
Screen recordings can create large video files, especially when using high resolutions or high-quality recording settings.
Make sure there is enough free storage before starting a long recording.
Do a short test first
This is especially important for tutorials, presentations, demonstrations and other recordings that would be difficult to repeat.
OBS’s official documentation specifically recommends testing recording settings before relying on the result.
Frequently Asked Questions
1. Is there a screen recorder built into Windows?
Yes. Windows 11 includes video recording in Snipping Tool. Xbox Game Bar has built-in recording too, for compatible apps and games on Windows 10 and Windows 11. Microsoft Clipchamp? Screen-recording and editing options.
2. How do I record my screen on Windows 11?
For a selected area, open Snipping Tool and choose Record. Or use Windows + Shift + R. Xbox Game Bar covers a supported app or game. Windows + Alt + R can start recording.
3. Can I record my Windows screen with audio?
Yes, but audio support depends on the tool and its version. Xbox Game Bar lets you include app or computer audio and toggle the microphone during recording. In current Windows 11 versions, Snipping Tool can also offer microphone recording controls. Clipchamp and OBS Studio provide separate recording and audio workflows, so test a short clip before recording anything important.
4. What is the difference between system audio and microphone audio?
System audio comes from the computer or application. Your selected microphone is the source for microphone audio. Want narration over a demonstration? You generally need microphone capture. Add it to whatever computer audio you want to include.
5. Is OBS Studio available for Windows?
Yes. OBS Studio currently supports Windows 10 and Windows 11, and it’s free and open source. Multiple capture sources, audio mixing and recording all work.
6. Which Windows screen recorder should beginners use?
Start with whichever built-in Windows option matches the task, since a simple recording doesn’t need advanced software. Nothing fancy. Need additional capture sources, audio controls, editing or streaming features? Move to a dedicated recorder.
Conclusion
The best screen recorder for Windows? Depends on what you need to capture.
Snipping Tool is a straightforward built-in option on Windows 11, for a selected area. Xbox Game Bar offers quick recording for a supported app or game, with computer audio and microphone controls. Clipchamp is useful when recording and editing need to work together. OBS Studio? Deeper control, for multi-source and more advanced recording workflows.
Choosing based only on the feature list won’t get you far, so start with the recording you want to create. A specific screen area, an application, system audio, microphone narration, a webcam or advanced production controls. Much easier to pick the right Windows screen-recording method that way.