Published: August 3, 2026
Last Updated: September 18, 2026
A smart home hub is what brings all your lights, locks, sensors and thermostat together into a single manageable system however in 2026, you may not even have to buy a device before you start. Quite a few Amazon Echo, Google Nest and Apple HomePod speakers are already hubs, with onboard Matter, Thread and Zigbee radios. This guide walks you through the entire setup process, from choosing the right hub through creating your first automation, in 30 to 60 minutes.
Definition: “A smart home hub is a device or embedded software, within a smart speaker, that integrates lights, locks, sensors, and thermostats across protocols such as Matter, Zigbee, and Thread into one device.”
Quick answer: Place your hub centrally, connect via Ethernet, configure through the companion app, pair one device first, then build automations from there.
What does a smart home hub do, and do you still need one in 2026?
The smart home hub transposes among the different wireless protocols (Zigbee, Z-Wave, Thread or Wi-Fi) so that the various devices can be communicated to a single app or voice command. In 2026 not all homes will require a dedicated hub because the Matter standard (administered by the Connectivity Standards Alliance) now enables many products to speak directly to a compatible smart speaker.
Apply this 3-question decision model to know if your current hardware will do or if you should purchase a dedicated hub:
- Do you have more than 5 different smart devices from multiple brands? If so, a dedicated hub simplifies management.
- Do any of your devices work over Z-Wave or Zigbee (not Wi-Fi)? If so, then you will need a speaker or hub that has those particular radios.
- Do you need automations that run without internet? If yes, prioritize a hub with full local processing.
If the answer to all three is no, then the Echo 4th Gen or Nest Hub 2nd Gen is your controller. See all smart home hubs and voice assistants for the detailed smart home hubs and voice assistants guide broken down by hub categories, ecosystems and voice assistant personality.
Which hub should you choose?
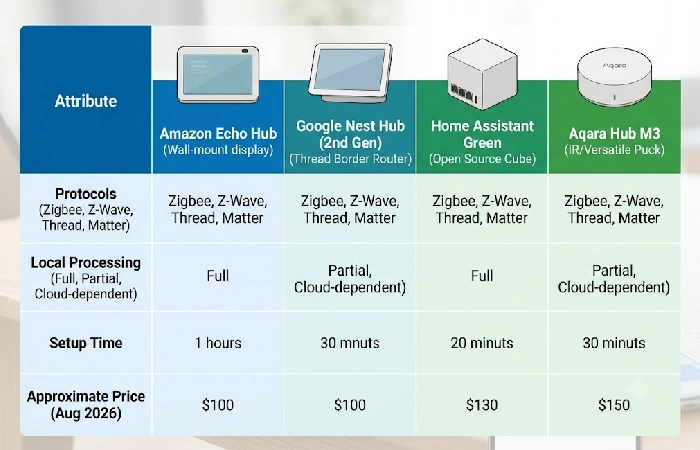
Ultimately, choosing the perfect hub is a question of which ecosystem you already operate in, what your protocol needs, and whether you want simplicity or total control. These are 4 options and the most common starting points in 2026. For more practical guidance on what dimensions to buy, after the orientation process, the pillar section connected above takes you through each ecosystem step by step.
| Hub |
Best for |
Protocols |
Local processing |
Setup time |
Price (Aug 2026) |
| Amazon Echo Hub |
Alexa households wanting a wall-mounted touch screen |
Matter, Zigbee, Thread, Wi-Fi, Bluetooth |
Partial – some routines local; Alexa skills need cloud |
Under 15 min |
₹150–₹180 |
| Google Nest Hub (2nd gen) |
Google Home users needing a Thread border router |
Matter, Thread, Wi-Fi, Bluetooth |
Partial – basic automations local; complex routines need cloud |
10–15 min |
₹80–₹100 |
| Home Assistant Green |
Power users desiring complete local management and lacking dependency on the cloud |
Matter or Thread through ZBT-1 dongle; Zigbee or Z-Wave through different dongles |
Full – all automations run locally |
20–30 min (browser-based config) |
₹99+ / ₹25–₹35 per dongle |
| Aqara Hub M3 |
Flexible configuration with IR blaster for legacy appliances. Protocol versatile setup. |
Matter, Zigbee 3.0, Thread, IR, Wi-Fi, Bluetooth |
Yes – scenes run on-device |
10–20 min |
₹70–₹90 |
Price based on manufacturer’s literature and confirmed retail prices, August 2026.
How should you prepare your network before plugging anything in?
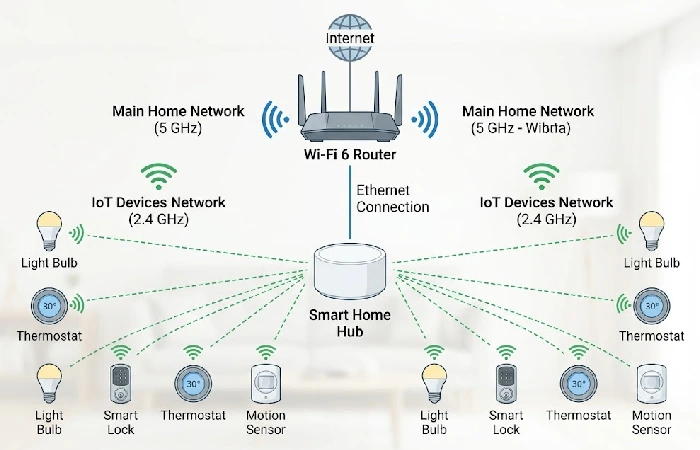
Configure your router to advertise another 2.4 GHz SSID before unpacking your hub. Just one simple step will prevent the most frequently mentioned pairing failure on troubleshooting sites (vesternet.com, letsbemates.com.au). Virtually nothing in the smart home universe works in the 5 GHz band, and single SSID dual band routers have a tendency to struggle, slow down, and hang up.
Three network-prep actions to complete first:
- Split your bands. Access the administration of your router. Assign a different SSID to one of your bands. For example ‘Home_IoT_2G’ to your 2.4Ghz band. Connect your hub and your smart devices to this network.
- Ethernet should be used for the hub. Where the hub is Ethernet enabled, connect it directly to your router upon first setup, providing the best commissioning.
- Make sure IPv6. To use a Thread device with a Google Nest Hub, your router needs to have IPv6 enabled. This is confirmed in Google Thread border router documentation.
How do you configure the hub through the companion app?
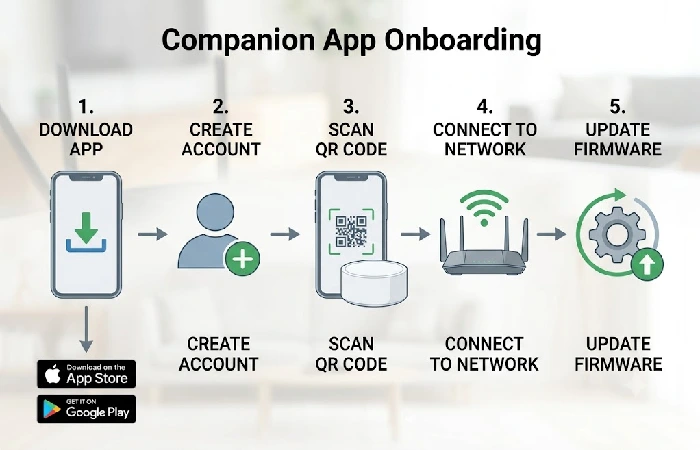
At each hub, a 5-step app onboarding process: download -> create account -> check code or scan code -> connect to network -> update firmware. The firmware update step is the one that most guides gloss over, up to 3 to 10 minutes on first boot. During this the hub might reboot a few times and an LED will pulse until the update is complete.
Step-by-step:
- Download the companion app by your hub: Alexa app (Amazon), the Google Home app (Google), the Home app (Apple), or the manufacturer’s own app (Aqara Home, Home Assistant mobile).
- Log in or create an account. Be prepared with a Wi-Fi password.
- Scan the QR code stamped on the hub (or inside the box on the quick-start card). Amazon Echo asks questions on the screen.
- Connect the hub to your 2.4 GHz network. During Ethernet connection, the app will simply find the wired connection without any action.
- Install the firmware update. Do not ignore this. It closes off vulnerabilities, and gives you support for the newest protocol. Wait until your hub has rebooted completely and then add your devices.
And the naming convention tip is: Label everything by room and use “Living Room Floor Lamp” and not “Lightbulb 1”. It will make things way easier when voice controlling and reading through your automations in 3 months from now.
How do you pair your first devices?
Pair one device at a time, test it works then move on. Standard batch pairing is the fastest way to get ghost devices, thus failed connections. Matter-certified devices make this step a simple QR-code scan through your hub’s companion app.
For non-Matter devices:
- Zigbee/Z-Wave: Place the device into pairing mode (usually press and hold reset for 5 seconds, until the LED flashes). In your hub app, select “Add Device”. Within 3m of the hub during initial pairing.
- Alexa skill linking: For Wi-Fi devices using Alexa, in the Alexa app -> More -> Skills & Games -> search device brand -> Enable Skill -> link your manufacturer account. Then say “Alexa, discover my devices.”
- Link your Thread devices to Google Home: Keep your Nest Hub or Nest Wifi Pro on the same network. The Google Home app will discover your Thread devices in the air while the border router is active.
Start by adding just one smart plug or bulb to verify your network and hub are working properly before you add a lock, camera or other sensor that will require more configuration.
How do you create your first automations and scenes?
An automation triggers an action when a condition(time, sensor, or location) becomes true; a scene executes several device states simultaneously. Start with three simple automations rather than building complex logic:
- Sunset lights: When it’s sunset, turn on the Living Room Floor Lamp with 60 percent brightness. All significant hub applications provide a sunset trigger, no need for manual time entries.
- Motion-activated hallway: If the motion sensor detects motion in the hallway after 10 PM, then turn on the Hallway Light at 20% for 2 minutes.
- Goodnight scene: “Lock the front door, set the thermostat to 20 C, turn off all the lights” one tap, or voice command.
For your hub (Home Assistant, Aqara M3, Homey Pro) that can run the automations locally, do this set the automations to run locally rather than in the cloud. Automations run locally in less than 1 second; the routines that are dependent on the cloud add about 1 to 3 seconds of delay.
What should you do when your hub will not connect?
The three most prevalent setup failures all you see are that the hub can’t find devices, that a device goes offline after pairing it, and that the app shows “device unreachable.” For all of them, one root cause is almost always to blame: network instability. Before escalating, try the following:
- Power-cycle in this order: Unplug the hub ->wait 30 seconds -> unplug the router -> wait 30 seconds -> plug the router back in and wait 2 minutes for complete boot-up -> plug the hub back in.
- Confirm band isolation. Make sure that the unit is on your 2.4GHz, not 5GHz network.
- Check protocol match. A Zigbee device will not pair to a Thread only hub. Make sure your hub has the needed radio (check the spec table above).
- Factory reset is a last option. This will delete all the devices you have paired and the settings. Should only be used if steps 1 to 3 have not worked, after two attempts.
What maintenance does a smart home hub need after setup?
A hub is not a set-and-forget appliance — skipping maintenance leads to offline devices, missed automations, and security vulnerabilities. Do this:
- Monthly: Open your hub app and verify any devices that are listed as “offline” or “unavailable.” For wireless sensors that have low power replace the batteries.
- Quarterly: Look for, and install firmware updates to the hub and individual devices. Review your automations – delete those that reference devices you have removed.
- Security hardening (once, during setup): Change default passwords where applicable. Enable 2-factor authentication on your hub account. If your router supports VLANs, isolate IoT devices on a dedicated network segment to limit exposure.
Frequently asked questions
1. Do I need a smart home hub in 2026?
Not necessarily. If your devices are Wi-Fi only and you use only a single ecosystem (whether Alexa, Google Home, or Apple Home) your current smart speaker is probably a controller already. A dedicated hub can be helpful if you have Zigbee/ Z-Wave devices, require automations when the internet is off, or have more than 10 to 15 devices across various brands.
2. What is the easiest smart home hub to set up?
Amazon Echo Hub and Google Nest Hub (2 nd gen): The easiest onboarding process is provided by both. Instant setup can be done on the device or application within 15 minutes. The Aqara Hub M3 is the easiest dedicated non-speaker hub with a QR-code-based Matter commissioning flow.
3. Can I use Alexa as a smart home hub?
YES. These devices (and others like them: Echo (4th gen), Echo Studio etc.) have built in Zigbee, Thread, and Matter radios. They can directly pair compatible devices without a separate hub. The drawback: complex automations and the majority of Alexa skills still need an internet/cloud connection as opposed to direct local processing on the device like Home Assistant.
4. How many devices can a smart home hub support?
The Zigbee standard theoretically allows for 65,535 nodes on a network (per Digi International and the CSA), although in reality limits are determined by your coordinator hardware. Most consumer-type hubs will reliably handle 50 to 100 directly paired devices. A handful of mains-powered Zigbee router devices (smart plugs, bulbs etc.) will expand the mesh, allowing for 200+ devices. For a first network setup, I suggest 10 to 15 devices. Once the mesh tightens up, you can gradually increase the number.
Your hub is set up, your first devices are connected, and your first automations are in motion. Now what? Now you begin selecting the devices you want in individual rooms, decide how you want routines to be (based on your simple family daily patterns), and implement those that will be most beneficial (this is addressed thoroughly in the entire pillar guide).